Introduction Churros and cheesecake are beloved desserts on their own, each offering a unique and delightful experience. Churros are known for their crunchy exterior and soft, doughy interior, often enjoyed dipped in chocolate or sprinkled with cinnamon sugar. Cheesecake, on the other hand, is celebrated …
Italian Sausage in an Air Fryer: A Delicious and Easy Guide
Cooking Italian sausage in an air fryer is a game-changer, offering a quick and healthier way to enjoy this classic dish. Whether you’re a busy parent looking for a fast dinner option or a food enthusiast exploring new ways to cook, this guide will walk you through everything you need to know.
What is an Air Fryer?
An air fryer is a kitchen appliance that uses hot air circulation to cook food, giving it a crispy texture similar to deep frying but with significantly less oil. It’s perfect for cooking a variety of foods, including Italian sausage.
Italian sausage is a flavorful and versatile ingredient that pairs well with many dishes. Cooking it in an air fryer enhances its natural flavors while reducing the fat content, making it a healthier option. Plus, it’s incredibly convenient for busy weeknights.
Italian Sausage in an Air Fryer
Benefits of Cooking Italian Sausage in an Air Fryer
Healthier Cooking Option
Air frying reduces the amount of oil needed, making your meals lower in fat and calories. This method is perfect for those who want to enjoy delicious Italian sausage without the guilt.
Time-Saving Benefits
The air fryer cooks food faster than traditional methods, cutting your cooking time in half. This is especially handy when you’re short on time but still want a homemade meal.
Enhanced Flavor and Texture
The hot air circulation in an air fryer ensures that your Italian sausage is evenly cooked, with a crispy exterior and juicy interior. This method locks in the flavors, giving you a restaurant-quality dish at home.
Ingredients Needed for Air Fryer Italian Sausage
Italian Sausage in an Air Fryer
Types of Italian Sausage
You can choose between sweet, mild, or spicy Italian sausage, depending on your preference. Each type offers a unique flavor profile that can be enhanced in the air fryer.
Essential Ingredients for a Flavorful Dish
Italian sausage (sweet, mild, or spicy)
Olive oil spray (optional for extra crispiness)
Fresh herbs (optional for garnish)
Bell peppers and onions (optional for a complete meal)
Step-by-Step Guide to Cooking Italian Sausage in an Air Fryer
Preparing the Sausage
Selecting the Best Sausage
Start by selecting high-quality Italian sausage from your local butcher or grocery store. Fresh sausage with natural casing will give you the best results.
Preheating the Air Fryer
Preheat your air fryer to 375°F (190°C). This ensures that the sausage cooks evenly and achieves that perfect crispy texture.
Cooking Process
Italian Sausage in an Air Fryer
Optimal Cooking Time and Temperature
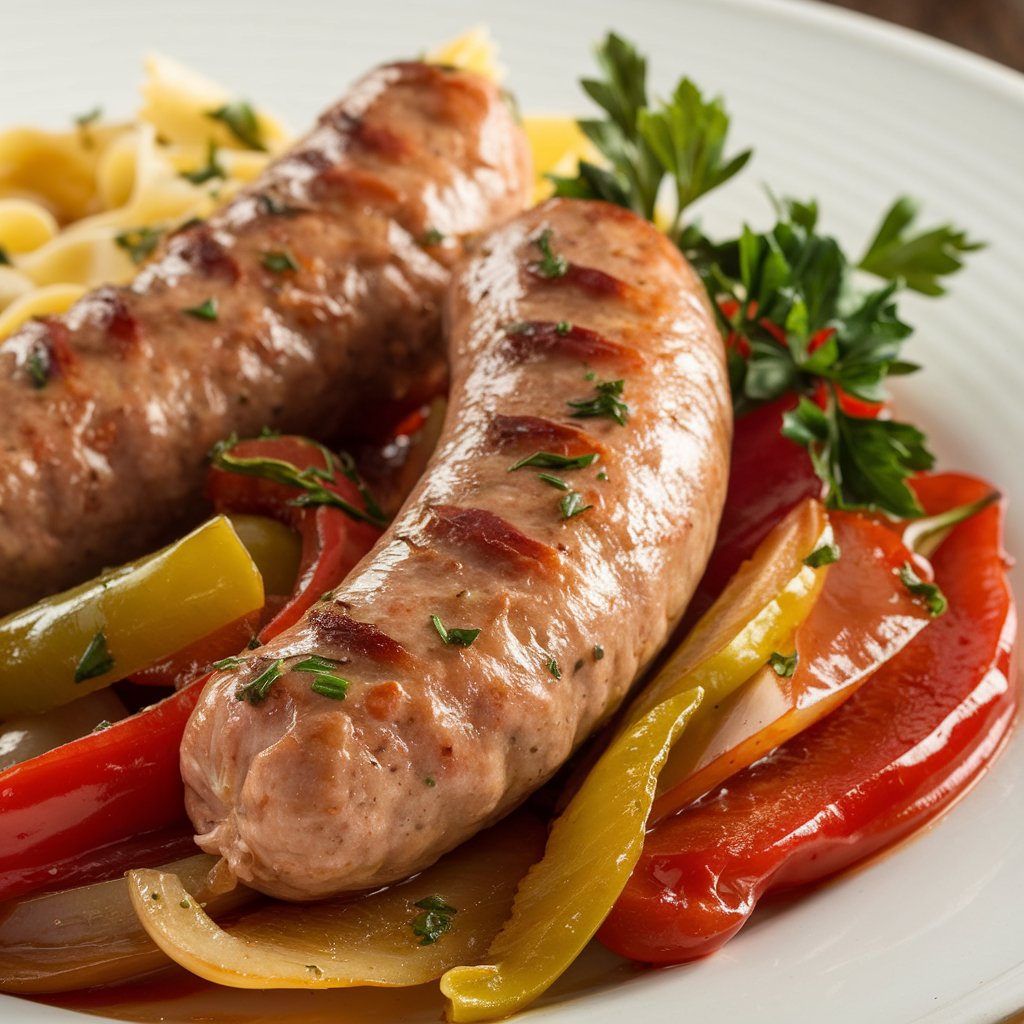
Place the sausages in the air fryer basket, making sure they don’t touch each other. Cook them at 375°F for about 12-15 minutes, flipping halfway through. The sausage should reach an internal temperature of 160°F (71°C) to be fully cooked.
Tips for Even Cooking
To ensure even cooking, avoid overcrowding the air fryer basket. You may need to cook the sausages in batches if you’re making a large quantity.
Serving Suggestions
Pairing with Side Dishes
Italian sausage pairs well with a variety of side dishes, such as roasted vegetables, pasta, or a fresh salad. These sides complement the sausage’s rich flavors.
Adding Toppings and Garnishes
Enhance your dish with toppings like sautéed bell peppers and onions, fresh basil, or a drizzle of balsamic glaze for added flavor.
Tips for Perfectly Cooked Italian Sausage in an Air Fryer
Avoiding Common Mistakes
Overcooking: Keep an eye on the sausage to avoid drying it out.
Undercooking: Always check the internal temperature to ensure it’s fully cooked.
Adjusting Cooking Time Based on Sausage Size
If you’re cooking smaller sausages, reduce the cooking time by a few minutes. For larger sausages, you may need to add a couple of minutes to ensure they’re cooked through.
Different Variations of Italian Sausage in an Air Fryer
Sweet Italian Sausage
Sweet Italian sausage is perfect for those who prefer a milder flavor. Pair it with a sweet tomato sauce or roasted vegetables for a satisfying meal.
Spicy Italian Sausage
For those who like a bit of heat, spicy Italian sausage offers a bold flavor that pairs well with tangy sauces or spicy peppers.
Sausage and Peppers
This classic combination of Italian sausage and sautéed bell peppers is a quick and delicious meal that you can prepare entirely in the air fryer.
Italian Sausage in an Air Fryer: Advantages and Disadvantages
Italian Sausage in an Air Fryer
Cooking Italian sausage in an air fryer has become a popular method due to its convenience and health benefits. But like any cooking method, it comes with its own set of pros and cons. In this article, we’ll explore both the advantages and disadvantages of using an air fryer to cook Italian sausage, helping you make an informed decision for your next meal.
Advantages of Cooking Italian Sausage in an Air Fryer
Healthier Cooking Option
One of the biggest advantages of using an air fryer is the reduction in oil needed to cook the sausage. Traditional frying methods often require a significant amount of oil, which adds extra fat and calories. Air frying, on the other hand, uses little to no oil, making the sausage a healthier option while still achieving a crispy texture.
Quick and Convenient
Air fryers are known for their speed. Cooking Italian sausage in an air fryer typically takes about 12-15 minutes, which is much faster than oven baking or stovetop methods. This makes it an ideal option for busy weeknights when you need to prepare a quick and satisfying meal.
Even Cooking and Crispiness
The air fryer circulates hot air around the food, ensuring that the Italian sausage is evenly cooked on all sides. This results in a perfectly crispy exterior while keeping the inside juicy and flavorful. The consistent temperature control of the air fryer also reduces the risk of burning or undercooking.
Easy Cleanup
Air fryers are relatively easy to clean compared to traditional frying pans or ovens. Most air fryer baskets are non-stick and dishwasher safe, making cleanup a breeze. This convenience adds to the overall appeal of using an air fryer for cooking Italian sausage.
Versatility
An air fryer is not limited to just cooking sausage. It can also be used to prepare a variety of dishes, from vegetables to desserts. This versatility means you can prepare a complete meal in the air fryer, saving time and reducing the number of dishes you need to wash.
Disadvantages of Cooking Italian Sausage in an Air Fryer
Limited Capacity
One of the main drawbacks of using an air fryer is its limited cooking capacity. Most air fryers have a small basket, which may not accommodate a large batch of Italian sausage. If you’re cooking for a crowd, you might need to cook in multiple batches, which can be time-consuming.
Texture Differences
While air fryers do a great job of crisping up the exterior of the sausage, some people find that the texture is not quite the same as traditional frying. The lack of oil can result in a slightly drier texture, which might not appeal to everyone. Adding a light spray of oil can help improve the texture, but it won’t replicate the exact feel of deep frying.
Initial Cost
Air fryers can be an investment. Although prices have come down over the years, a high-quality air fryer can still be relatively expensive. If you’re not planning to use it frequently, the cost might outweigh the benefits.
Learning Curve
For those new to air frying, there may be a learning curve in terms of cooking times and temperatures. Overcooking or undercooking the sausage is a common issue until you get the hang of using the appliance. Additionally, each air fryer model may have different settings, so it might take some experimentation to achieve the perfect result.
Lack of Browning
While air fryers are excellent at crisping, they may not brown the sausage as evenly as traditional methods like grilling or pan-frying. If you prefer a deep, caramelized crust on your Italian sausage, you might find the air fryer lacking in this department.
Conclusion
Cooking Italian sausage in an air fryer is an easy, quick, and healthier alternative to traditional methods. Whether you prefer sweet or spicy sausage, the air fryer ensures a delicious and perfectly cooked meal every time. Give it a try, and you’ll find it becoming a regular part of your cooking routine.
Veggie Spring Rolls in an Air Fryer: A Crispy, Healthy Delight Introduction Veggie spring rolls are a delightful snack or appetizer, loved for their crispy texture and fresh flavors. Using an air fryer to cook them takes the crispy factor to a new level while …
When it comes to quick, delicious, and healthy snacks, frozen sweet potato fries cooked in an air fryer are unbeatable. Whether you’re a kitchen novice or a seasoned cook, using an air fryer to whip up these tasty fries is not only convenient but also a healthier alternative to traditional frying methods. In this guide, we’ll walk you through everything you need to know about cooking frozen sweet potato fries in an air fryer, from the best techniques to mouth-watering seasoning ideas. Let’s dive in!
Why Choose Frozen Sweet Potato Fries?
Convenience and Ease of Use
One of the main reasons to opt for frozen sweet potato fries is the convenience factor. They come pre-cut, pre-seasoned, and ready to cook, saving you time and effort. No need to peel, chop, or worry about achieving the perfect fry shape—they’re already prepared for you.
Nutritional Benefits of Sweet Potatoes
Sweet potatoes are a nutritional powerhouse. They are rich in vitamins A and C, potassium, and fiber. Compared to regular fries, sweet potato fries offer a slightly sweet flavor and are packed with antioxidants that contribute to overall health. When you choose sweet potato fries, you’re not just indulging in a tasty treat but also making a nutritious choice.
Air fryers have revolutionized the way we cook our favorite snacks. They use hot air circulation to cook food, requiring little to no oil, which significantly reduces the fat content of your fries. This means you can enjoy crispy, golden-brown fries with fewer calories and less guilt.
Quick and Efficient
Air fryers are known for their speed. Unlike conventional ovens that take a while to preheat, air fryers heat up quickly, cooking your fries in a fraction of the time. In just 15-20 minutes, you can have a piping hot batch of sweet potato fries ready to serve.
How to Cook Frozen Sweet Potato Fries in an Air Fryer
Prepping the Air Fryer
Before you begin, make sure your air fryer is clean and properly set up. Preheat the air fryer to 400°F (200°C) for about 3-5 minutes. This step ensures that the fries cook evenly and become perfectly crispy.
Best Temperature and Time Settings
The ideal temperature for cooking frozen sweet potato fries in an air fryer is 400°F (200°C). Cook the fries for about 15-20 minutes, shaking the basket halfway through to ensure even cooking. Keep an eye on them during the last few minutes to achieve your desired level of crispiness.
Tips for Perfectly Crispy Fries
Don’t overcrowd the basket: Give the fries some space to allow the hot air to circulate freely.
Shake the basket: Halfway through cooking, shake the basket to flip the fries and ensure even browning.
Add a light spray of oil: If you prefer extra crispy fries, a light spray of oil before cooking can enhance the texture.
Common Mistakes to Avoid
Overcrowding the Basket
Overcrowding the basket is a common mistake that leads to unevenly cooked fries. To achieve that perfect crisp, it’s important to cook the fries in batches if necessary. This ensures that each fry gets enough space to cook evenly.
Not Shaking the Basket
Forgetting to shake the basket halfway through the cooking process can result in fries that are crisp on one side but soggy on the other. Shaking the basket helps redistribute the fries, allowing them to cook evenly on all sides.
Adding Flavor: Seasoning Ideas
Simple Salt and Pepper
Sometimes, simple is best. A dash of salt and pepper is all you need to enhance the natural sweetness of sweet potato fries. Sprinkle it on as soon as the fries come out of the air fryer for maximum flavor absorption.
Spicy Cajun Fries
If you like a bit of heat, try seasoning your fries with Cajun spices. A blend of paprika, garlic powder, onion powder, and cayenne pepper adds a kick to your fries, making them a perfect snack with a zesty twist.
Sweet and Savory Cinnamon Sugar
For a unique flavor combination, consider adding a sprinkle of cinnamon sugar. The sweetness of the cinnamon pairs beautifully with the natural flavors of sweet potato fries, creating a delightful treat that’s hard to resist.
Serving Suggestions for Sweet Potato Fries
Frozen Sweet Potato
Pairing with Dipping Sauces
Dipping sauces take your sweet potato fries to the next level. Ketchup is a classic choice, but why not try something different like honey mustard, garlic aioli, or even a spicy sriracha mayo? The possibilities are endless.
Sweet Potato Fries as a Side Dish
Sweet potato fries make an excellent side dish for a variety of meals. They pair wonderfully with burgers, grilled chicken, or even a fresh salad. Their versatility makes them a go-to option for any occasion.
Cleaning and Maintenance of Your Air Fryer
Proper Cleaning Tips
To keep your air fryer in top shape, it’s important to clean it after each use. Remove the basket and wash it with warm, soapy water. For stubborn grease, a soft brush can help scrub away residue. Don’t forget to wipe down the interior of the air fryer with a damp cloth.
Extending the Life of Your Air Fryer
Regular maintenance is key to extending the life of your air fryer. In addition to cleaning, check the air fryer’s components, such as the heating element and fan, to ensure they’re working properly. Following the manufacturer’s instructions for care and use will help your air fryer last longer.
Absolutely! Reheating sweet potato fries in an air fryer is a great way to restore their crispiness. Set the air fryer to 350°F (175°C) and heat the fries for 3-5 minutes, shaking the basket halfway through.
Are Sweet Potato Fries Healthier than Regular Fries?
Yes, sweet potato fries are generally considered healthier than regular fries. They contain more vitamins and nutrients, such as vitamin A and fiber, making them a more nutritious option.
Conclusion
Cooking frozen sweet potato fries in an air fryer is a game-changer. It’s a simple, quick, and healthy way to enjoy a delicious snack that everyone loves. Whether you’re a fan of classic salt and pepper or prefer more adventurous seasonings, there’s no limit to how you can enjoy these tasty fries. With the right tips and tricks, your sweet potato fries will come out perfectly crispy every time.
5 Unique FAQs After Conclusion
Can I use fresh sweet potatoes instead of frozen?
Yes, but you’ll need to cut them into fries and adjust the cooking time accordingly.
Do I need to defrost frozen sweet potato fries before cooking?
No, cook them straight from the freezer for the best results.
Can I cook other frozen vegetables in an air fryer?
Absolutely! The air fryer is great for cooking a variety of frozen vegetables.
Is it safe to use aluminum foil in an air fryer?
Yes, but be sure to use it carefully, avoiding contact with the heating element.
Totino’s Pizza Air Fryer: The Ultimate Guide Introduction When you think of quick and tasty pizza, Totino’s Pizza often comes to mind. These frozen pizzas have been a household favorite for years. But did you know that you can make them even better with an …
Frozen Chicken Tenders in Air Fryer: The Ultimate Guide for a Crispy Delight
Introduction
Frozen chicken tenders are a quick and convenient meal option, but have you ever wondered how to make them extra crispy and delicious? Enter the air fryer—a kitchen gadget that has revolutionized home cooking. Not only does it make cooking easier, but it also offers a healthier alternative to traditional frying methods. In this article, we’ll explore everything you need to know about cooking frozen chicken tenders in an air fryer, ensuring you achieve that perfect golden-brown crunch every time.
Frozen Chicken Tenders
Understanding Frozen Chicken Tenders
What Are Frozen Chicken Tenders?
Frozen chicken tenders are pre-breaded strips of chicken, often made from the tenderloin part of the chicken breast. They are a popular choice for quick meals and snacks because they can be cooked directly from frozen, saving you time and effort.
Types of Frozen Chicken Tenders Available
From classic breaded tenders to spicy varieties, the options are vast. Some are gluten-free, while others are seasoned with herbs and spices. Knowing the different types available can help you choose the best option for your taste and dietary preferences.
Nutritional Information
While chicken tenders are generally high in protein, the nutritional content can vary depending on the brand and type. It’s important to read the labels to understand what you’re consuming, especially if you’re watching your calorie intake or trying to avoid certain ingredients.
An air fryer circulates hot air around the food, cooking it quickly and evenly. This method mimics the results of deep frying but uses significantly less oil, making it a healthier option.
Health Benefits of Using an Air Fryer
Air frying reduces the amount of fat and calories in your food, making it a better choice for those looking to eat healthier without sacrificing flavor. Plus, it eliminates the mess and hassle associated with traditional frying methods.
Comparing Air Frying to Other Cooking Methods
When compared to baking or deep frying, air frying offers the best of both worlds. You get the crispy texture of fried food without the added grease, and it’s faster than baking in the oven.
Preparing Frozen Chicken Tenders for Air Frying
Do You Need to Thaw Frozen Chicken Tenders?
One of the biggest advantages of cooking frozen chicken tenders in an air fryer is that there’s no need to thaw them. Simply take them out of the freezer and pop them straight into the air fryer.
Seasoning Ideas for Extra Flavor
While frozen chicken tenders come pre-seasoned, you can always add a little extra flair. Sprinkle some garlic powder, paprika, or even Parmesan cheese before cooking to elevate the flavor.
Recommended Cooking Times and Temperatures
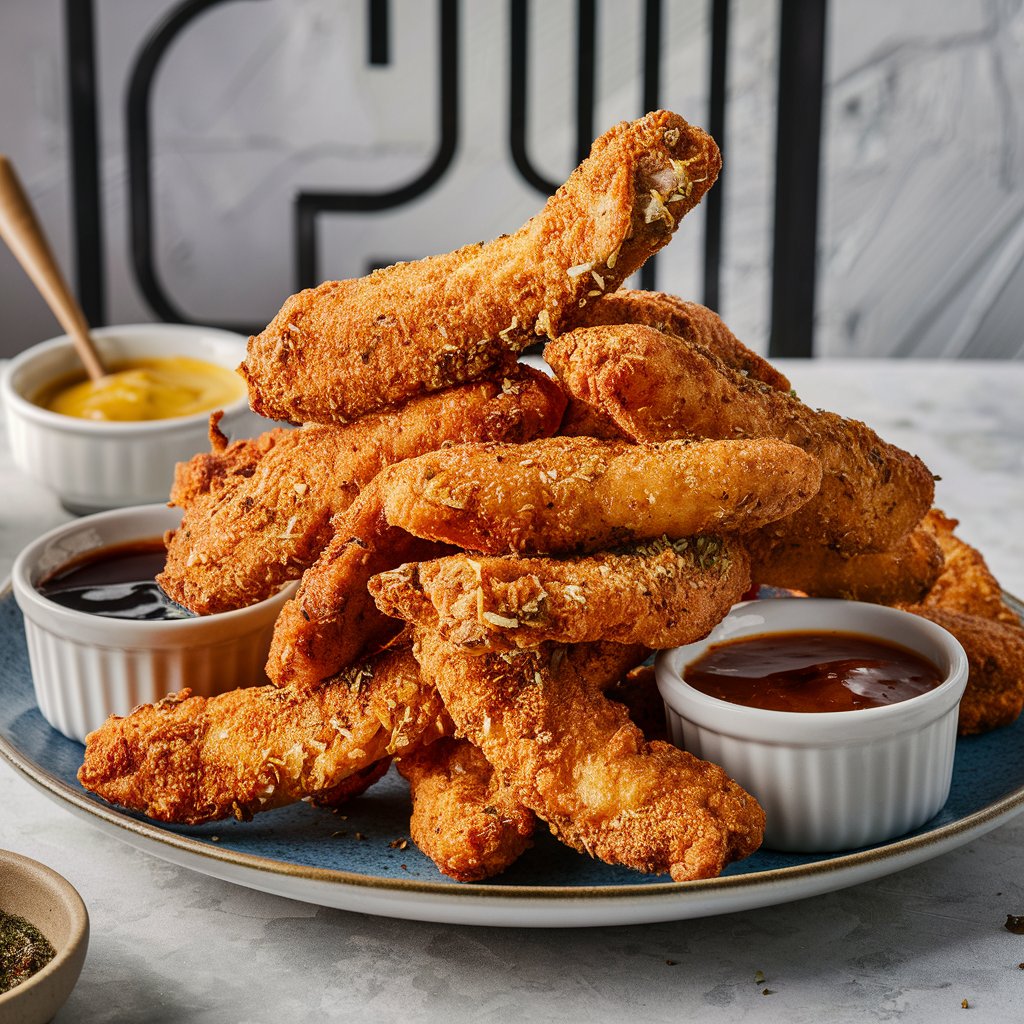
For perfectly cooked chicken tenders, set your air fryer to 400°F (200°C) and cook for 10-12 minutes, flipping halfway through. This will ensure they are crispy on the outside and juicy on the inside.
Step-by-Step Guide to Air Frying Frozen Chicken Tenders
Frozen Chicken Tenders
Preheating the Air Fryer
Start by preheating your air fryer to ensure even cooking. Most models take about 3-5 minutes to reach the desired temperature.
Arranging the Chicken Tenders in the Basket
Arrange the tenders in a single layer in the air fryer basket. Avoid overcrowding to allow air to circulate freely, which helps achieve that coveted crispy texture.
Cooking Process Explained
Cook the tenders for 10-12 minutes, flipping them halfway through to ensure both sides are evenly browned. Check for an internal temperature of 165°F (74°C) to ensure they are fully cooked.
Tips for Perfectly Crispy Chicken Tenders
How to Avoid Overcooking
Overcooking can lead to dry, tough chicken tenders. Keep a close eye on the cooking time and use a meat thermometer to check the internal temperature.
Achieving Even Crispiness
To achieve even crispiness, make sure the tenders are evenly spaced in the basket and flip them halfway through the cooking process.
Enhancing Flavor with Simple Add-ons
Consider adding a drizzle of honey, a squeeze of lemon, or a sprinkle of fresh herbs right after cooking to add a burst of flavor.
Serving Suggestions
Pairing Chicken Tenders with Sides
Chicken tenders pair well with a variety of sides. Consider serving them with a fresh salad, some crispy French fries, or a side of coleslaw.
Sauce Ideas for Dipping
From classic ketchup and mustard to more adventurous options like sriracha mayo or honey mustard, having a variety of dipping sauces can make your meal more exciting.
Presentation Tips
For a more appealing presentation, garnish your plate with some fresh herbs, lemon wedges, or a sprinkle of cheese.
Cleaning and Maintaining Your Air Fryer
Cleaning Tips After Cooking Chicken Tenders
After the tenders are done, clean your air fryer by wiping down the basket and the interior with a damp cloth. Most baskets are dishwasher safe, making cleanup a breeze.
Maintaining the Air Fryer for Longevity
Regularly check and clean the heating element and fan to keep your air fryer in top condition. This ensures even cooking and extends the life of your appliance.
Common Issues and Troubleshooting
If your air fryer isn’t heating properly or the food isn’t cooking evenly, make sure the basket isn’t overcrowded and that the air fryer is clean and well-maintained.
Health Considerations
Frozen Chicken Tenders
Caloric Content of Air-Fried Chicken Tenders
Air-fried chicken tenders are lower in calories and fat compared to deep-fried versions, making them a healthier choice for those watching their intake.
Comparing Air-Fried vs. Deep-Fried Chicken Tenders
Air-fried tenders have fewer calories and less fat, but they still retain a crispy texture and delicious flavor, making them a guilt-free indulgence.
Nutritional Adjustments for Healthier Meals
Consider pairing your chicken tenders with a side of steamed vegetables or a whole-grain option to create a more balanced meal.
Conclusion
Air frying frozen chicken tenders is a quick, easy, and healthier way to enjoy this classic comfort food. With the tips and tricks outlined in this guide, you’ll be able to make perfectly crispy chicken tenders every time. So why not give it a try and elevate your next meal?
FAQs
Can I Cook Frozen Chicken Tenders Without Thawing?
Yes, you can cook them directly from frozen without thawing.
How Do I Make My Chicken Tenders Extra Crispy?
Ensure they are evenly spaced in the air fryer and flip them halfway through cooking.
What Temperature Should I Cook Frozen Chicken Tenders At?
Cook at 400°F (200°C) for 10-12 minutes.
Air Fryer Italian Sausage: A Delicious and Easy Way to Enjoy a Classic Dish If you’re looking for a quick and tasty way to cook Italian sausage, the air fryer is your new best friend. This method not only brings out the rich flavors of …