The Ultimate Corned Beef and Cabbage Recipe: Easy Guide, Tips, and Variations Corned beef and cabbage is a classic dish that combines tender, flavorful meat with the comforting taste of cabbage and vegetables. It’s simple to make, yet packed with flavors that everyone can enjoy. …
Melt in Your Mouth Chicken Recipe A “Melt in Your Mouth Chicken” recipe brings juicy, tender chicken topped with a creamy, tangy layer that’s baked to perfection. This easy-to-follow recipe makes delicious chicken that’s versatile and sure to be a family favorite. With a few …
The Ultimate Chocolate Cake Recipe: Moist, Rich, and Easy to Make!
Chocolate Cake Recipe
Few things in life are as satisfying as a slice of perfectly moist, rich chocolate cake. Whether it’s a birthday, holiday, or simple craving for something sweet, chocolate cake is a go-to dessert for nearly every occasion. With this ultimate recipe, you’ll make a chocolate cake that’s not only delicious but also easy to bake and customizable. Let’s dive in and make a chocolate cake that’s guaranteed to impress everyone!
Introduction to the Perfect Chocolate Cake
Why This Chocolate Cake Recipe is Special
This chocolate cake recipe balances flavor, texture, and ease, creating a cake that’s soft, fluffy, and intensely chocolaty. Perfect for beginners and seasoned bakers alike, this recipe includes steps for a cake that’s ideal for layering or baking as a single sheet. With simple ingredients, you can whip up a dessert that tastes like it’s straight from a bakery!
Key Features of a Perfect Chocolate Cake
A great chocolate cake should be:
Moist: The right ingredients and baking time ensure that it stays soft and never dry.
Rich in Flavor: The use of cocoa powder and coffee (optional) deepens the chocolate taste.
Easy to Make: With straightforward steps, you can have a homemade cake that rivals store-bought ones.
Ingredients Needed for the Ultimate Chocolate Cake
Chocolate Cake Recipe
Essential Ingredients for the Cake Base
Here’s what you need to make the cake:
Flour: Provides structure to the cake.
Sugar: Adds sweetness and moisture.
Cocoa Powder: Use unsweetened cocoa powder for intense chocolate flavor.
Baking Soda and Baking Powder: Helps the cake rise and stay fluffy.
Salt: Balances the sweetness.
Eggs: Adds richness and helps bind the ingredients.
Milk: Keeps the cake moist and creamy.
Vegetable Oil: Adds moisture without adding any overpowering flavor.
Vanilla Extract: Enhances the cake’s flavor.
Hot Water or Coffee: Hot liquid intensifies the chocolate flavor and makes the batter smoother.
Ingredients for the Best Chocolate Frosting
For a creamy frosting:
Butter: Creates a creamy base.
Powdered Sugar: Sweetens the frosting without making it grainy.
Cocoa Powder: Adds chocolatey richness.
Milk or Cream: Adjusts consistency for a smooth spread.
Vanilla Extract: Boosts the overall flavor.
Optional Add-Ins and Flavor Boosters
Add a twist to your cake with options like:
Chocolate Chips for extra texture.
Espresso Powder to amplify the chocolate flavor.
A Splash of Rum or Brandy for a unique taste.
Step-by-Step Guide to Making Chocolate Cake
Chocolate Cake Recipe
Prepping Ingredients and Setting Up
Start by gathering all your ingredients and preheating your oven to 350°F (175°C). Grease and flour your cake pans or line them with parchment paper to prevent sticking.
Making the Batter
Combine Dry Ingredients: In a large bowl, whisk together flour, sugar, cocoa powder, baking soda, baking powder, and salt.
Add Wet Ingredients: Add eggs, milk, vegetable oil, and vanilla extract to the dry ingredients. Mix until smooth.
Add Hot Water or Coffee: Slowly add hot water (or coffee) to the batter, stirring until well combined. The batter will be thin, but this helps make a moist cake.
Baking the Cake to Perfection
Pour the batter evenly into prepared pans. Bake for 30-35 minutes or until a toothpick inserted into the center comes out clean. Let the cakes cool in the pans for about 10 minutes, then transfer them to a wire rack to cool completely.
Preparing the Chocolate Frosting
Cream the Butter: In a large bowl, beat softened butter until creamy.
Add Cocoa Powder: Slowly mix in the cocoa powder until well blended.
Add Powdered Sugar and Milk: Alternate adding powdered sugar and milk, beating after each addition until smooth.
Add Vanilla Extract: Stir in vanilla extract for enhanced flavor. If the frosting is too thick, add a bit more milk.
Assembling and Decorating the Cake
Once the cake layers are completely cool, place one layer on a serving plate. Spread a generous amount of frosting on top, then add the second layer and frost the top and sides. For extra flair, sprinkle chocolate shavings or add a drizzle of chocolate ganache on top.
Tips for a Rich and Moist Chocolate Cake
Chocolate Cake Recipe
Choosing the Right Type of Cocoa Powder
Use high-quality unsweetened cocoa powder for the best results. Dutch-processed cocoa will give the cake a deeper color, while natural cocoa has a more intense chocolate flavor.
Secrets to a Moist Cake Texture
To keep the cake moist:
Use Oil Instead of Butter: Oil makes the cake more moist and tender.
Add Hot Water or Coffee: Hot liquid enhances the cocoa powder, making the chocolate flavor richer.
Serving Suggestions for Chocolate Cake
Best Ways to Serve Chocolate Cake
Serve the cake at room temperature to let the frosting stay soft and creamy. Chocolate cake pairs well with a scoop of vanilla ice cream or a dollop of whipped cream.
Pairing the Cake with Beverages
Pair chocolate cake with milk for a classic combination, or serve it with a warm drink like coffee or tea. For special occasions, a glass of red wine or a rich port complements the deep chocolate flavor.
For a dairy-free cake, use almond or soy milk in the batter and replace butter in the frosting with a dairy-free alternative. Use a flax egg (1 tablespoon ground flaxseed mixed with 3 tablespoons water) as an egg substitute.
Gluten-Free Chocolate Cake Recipe
Substitute all-purpose flour with a gluten-free flour blend. Make sure your cocoa powder is gluten-free, as some brands may have additives.
Chocolate Lava Cake Twist
For an indulgent twist, try making chocolate lava cakes by under-baking individual cakes slightly, resulting in a gooey center.
Storing and Freezing Chocolate Cake
Best Storage Practices for Freshness
Store leftover chocolate cake in an airtight container at room temperature for up to 3 days. If it’s hot, keep the cake in the refrigerator to prevent the frosting from melting.
Freezing Tips for Longer Shelf Life
Wrap individual cake slices or whole layers in plastic wrap and store them in a freezer-safe bag. Freeze for up to 3 months. When ready to serve, thaw at room temperature and enjoy!
Can I use regular cocoa powder instead of Dutch-processed cocoa?
Yes, but it may alter the taste slightly. Natural cocoa is more acidic, while Dutch-processed cocoa gives a milder, darker result.
Do I have to use coffee in the recipe?
Coffee enhances chocolate flavor, but it’s optional. Hot water works well if you don’t like coffee.
Baking Troubleshooting Tips
Why did my cake sink in the middle?
This can happen if the cake batter is over-mixed, or if the oven door is opened too early. Make sure to follow the baking time and avoid opening the oven too soon.
How do I make sure my cake doesn’t stick to the pan?
Grease the pans well and line them with parchment paper for easy release.
Conclusion
This chocolate cake recipe brings together the best ingredients and techniques for a cake that’s moist, rich, and absolutely delicious. With easy instructions, a few tricks for extra moisture, and customization ideas, you’ll have a dessert that everyone will love. Perfect for birthdays, celebrations, or any time you want something chocolatey, this cake is sure to impress!
Frequently Asked Questions (FAQs)
Can I use margarine instead of butter in the frosting?
Yes, but it may slightly alter the flavor. Butter provides a creamier and richer taste.
How can I make the cake more chocolaty?
Add chocolate chips or use espresso powder to intensify the chocolate flavor.
Is it possible to make this cake without eggs?
Yes! Substitute eggs with a mixture of 1 tablespoon ground flaxseed with 3 tablespoons water per egg.
Can I bake this cake in a bundt pan?
Yes, but you may need to adjust the baking time and temperature slightly.
What’s the best way to keep the cake moist overnight?
Cover it tightly with plastic wrap or keep it in an airtight container to retain moisture.
The Ultimate Beef Stroganoff Recipe: Easy, Delicious, and Perfect for Any Night! Beef Stroganoff is a dish that combines tender strips of beef with a creamy mushroom sauce, resulting in a comforting and rich meal perfect for any occasion. With roots tracing back to …
Beef and broccoli is a classic dish that’s popular in many Chinese-American restaurants. It’s savory, slightly sweet, and packed with healthy broccoli, making it a satisfying, balanced meal. The best part? You can make this restaurant-style beef and broccoli at home in under 30 minutes! …
“Discover the ultimate Mojito recipe—step-by-step instructions for a refreshing, summer-ready drink.”
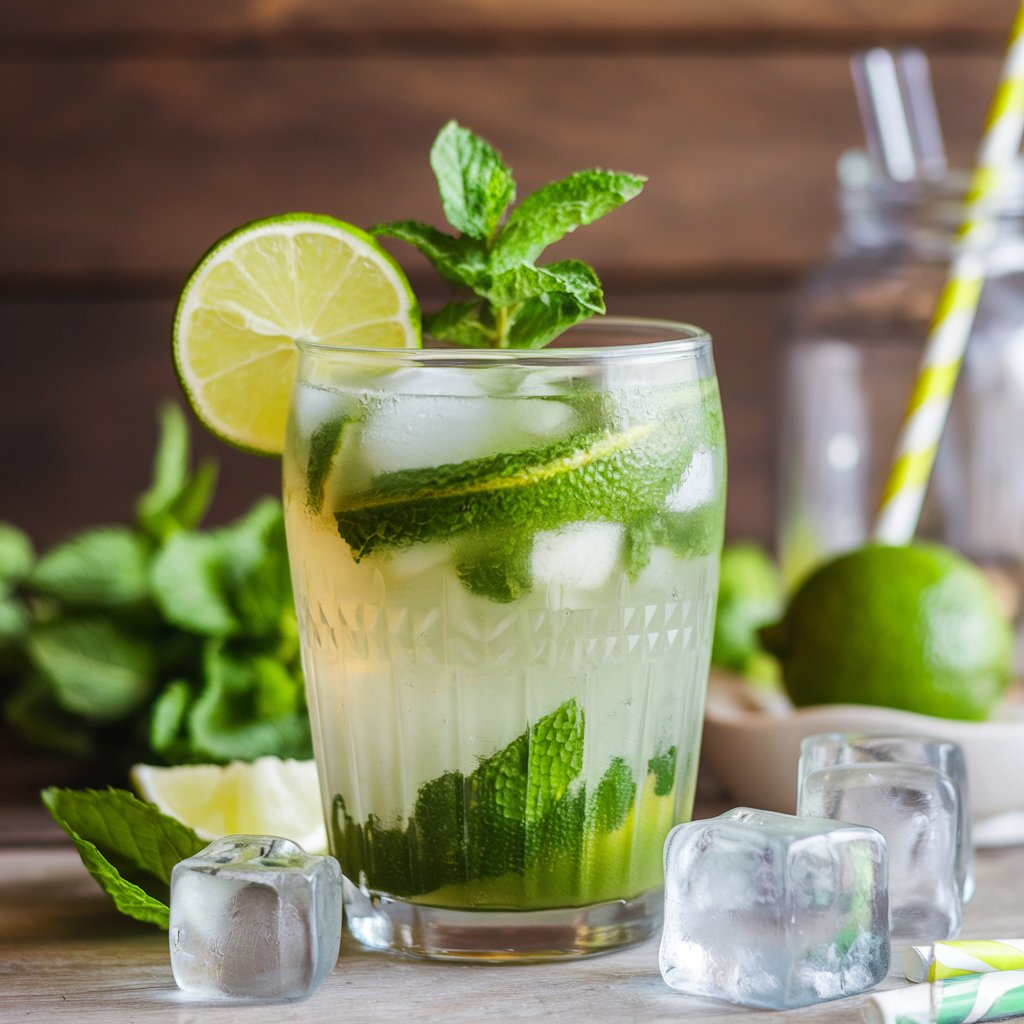
The Mojito is a world-famous cocktail that has won hearts with its delightful mix of mint, lime, and rum. It’s a drink that instantly transports you to tropical beaches, with a refreshing taste that’s perfect for hot summer days or casual gatherings with friends. Whether you’re a cocktail connoisseur or just starting out, learning how to make the perfect Mojito at home is a must. In this guide, I’ll take you through every step, so by the end, you’ll be making Mojitos like a pro!
What is a Mojito?
Mojito recipe
A Mojito is a Cuban cocktail made with five key ingredients: mint, lime, sugar, rum, and soda water. Its origins date back to the 16th century, and over time, it evolved into the refreshing cocktail we know today. It’s beloved worldwide because it’s light, easy to drink, and bursting with fresh, tangy flavors.
Why the Mojito is So Popular
One reason the Mojito is so popular is its perfect balance of sweetness and acidity, mixed with the cooling effect of fresh mint. The white rum gives it a subtle kick without overpowering the drink. Plus, the splash of soda water adds a light, bubbly finish that’s irresistible. It’s the ultimate drink for summer BBQs, pool parties, or even a casual evening at home.
Ingredients for the Perfect Mojito
To make a great Mojito, the quality of your ingredients matters. Here’s what you’ll need:
Fresh Mint Leaves: Essential for that cool, minty taste.
Fresh Lime Juice: Adds the zing and tang.
White Rum: A good-quality white rum blends smoothly without dominating the flavor.
Sugar or Simple Syrup: You can use either, but simple syrup dissolves more easily.
Club Soda: The fizz that lightens the drink.
Ice: A must to keep the Mojito cool and refreshing.
Step-by-Step Guide to Making a Mojito
Step 1: Muddle the Mint and Sugar
In a sturdy glass, place 10-12 fresh mint leaves and 2 teaspoons of sugar (or simple syrup). Use a muddler or the back of a spoon to gently press the mint into the sugar. This releases the oils from the mint without tearing the leaves, giving you that fresh, minty taste.
Step 2: Add Lime Juice
Squeeze the juice from half a lime into the glass. Lime is crucial for the tangy flavor that balances out the sweetness of the sugar.
Step 3: Pour in the Rum
Add 2 ounces of white rum to the glass. This will give the Mojito its boozy kick, but the other ingredients will mellow out the rum’s strength.
Step 4: Top with Ice and Club Soda
Fill the glass with ice cubes, and then top it off with club soda. Stir gently to combine all the ingredients without losing too much of the soda’s fizz.
Step 5: Garnish and Serve
Garnish your Mojito with a sprig of mint and a lime wedge. You can also add a straw for easy sipping. Now, enjoy your refreshing, homemade Mojito!
Tips for the Best Mojito
Use Fresh Ingredients: Always use fresh mint and freshly squeezed lime juice for the best flavor.
Don’t Over-Muddle: Gently muddling the mint is key. Too much force will tear the leaves, making your drink taste bitter.
Choose the Right Rum: A mid-range white rum is ideal. Dark rums are too heavy for a Mojito, while spiced rums will interfere with the fresh flavors.
Delicious Mojito Variations
Want to mix things up? Try these fun Mojito variations:
Strawberry Mojito
Add a few fresh strawberries during the muddling process for a fruity twist. The strawberries add a sweet, juicy flavor that pairs perfectly with the mint and lime.
Coconut Mojito
Swap the white rum for coconut rum, or add a splash of coconut water. This gives your Mojito a tropical vibe, making it feel like a mini-vacation in a glass.
Pineapple Mojito
For a tangy, tropical twist, add a splash of pineapple juice. Pineapple adds extra sweetness and a punch of flavor that blends beautifully with the lime and mint.
How to Make a Virgin Mojito (Alcohol-Free)
Mojito recipe
If you want to enjoy the refreshing taste of a Mojito without the alcohol, it’s easy to make a non-alcoholic version. Here’s how:
Ingredients:
Fresh mint
Lime juice
Sugar or simple syrup
Club soda or sparkling water
Ice
Follow the same steps as a regular Mojito, but skip the rum. You’ll still get that cool, refreshing taste that’s perfect for any occasion.
Best Times to Enjoy a Mojito
Mojitos are a versatile drink that works in various settings. Here are some of the best times to serve them:
At Summer BBQs: The light, refreshing flavor makes it a hit at outdoor gatherings.
Poolside Parties: Sip on a cold Mojito while soaking up the sun.
Casual Get-Togethers: It’s easy to make in batches for a crowd.
Tropical-Themed Events: The Mojito’s tropical origins make it the perfect drink for luaus or beach-themed parties.
Mojito Pairings: What to Eat with Your Drink
Pairing food with your Mojito is all about complementing its refreshing, light flavors. Here are some great options:
Light Appetizers: Dishes like guacamole, ceviche, or fresh salsa work well with the citrusy and minty notes of a Mojito.
Grilled Meats: Mojitos pair beautifully with grilled chicken, shrimp, or fish.
Tropical Fruits: Fresh fruits like mango, pineapple, or watermelon make an excellent snack alongside your drink.
Mojito recipe
Common Mistakes to Avoid When Making a Mojito
Even though a Mojito is simple to make, there are a few common mistakes to avoid:
Over-Muddling the Mint: Crushing the mint leaves too much can make your drink bitter. Be gentle!
Using Pre-Made Lime Juice: Always use fresh lime juice for the best flavor.
Adding Too Much Sugar: A Mojito should have a balance of sweetness, acidity, and freshness. Too much sugar will overwhelm the drink.
Healthier Mojito Options
If you’re watching your sugar intake or alcohol consumption, there are ways to make your Mojito healthier:
Use a Low-Calorie Sweetener: Swap the sugar for a low-calorie sweetener like stevia or monk fruit.
Reduce the Alcohol Content: Cut back on the rum and add more club soda for a lighter drink.
Use Sparkling Water Instead of Soda: Opt for sparkling water instead of soda for a sugar-free version.
How to Make Mojitos for a Party
If you’re hosting a party, making Mojitos in large batches can save time and effort. Here’s how:
Muddle mint and lime juice in a large pitcher.
Add rum, sugar, and club soda.
Stir well and add ice just before serving to keep it cool and refreshing.
Advantages of a Mojito
Refreshing Flavor
The combination of mint, lime, and soda water makes the Mojito one of the most refreshing drinks out there. The mint cools the palate, while the lime adds a zing that cuts through the sweetness, making it ideal for hot summer days.
Easy to Make at Home
One of the greatest advantages of the Mojito is how simple it is to prepare. With just a few fresh ingredients, you can whip up a professional-level cocktail in minutes.
Versatile and Customizable
Mojitos are highly customizable. You can adjust the amount of sugar, lime, or rum based on your taste preferences. It’s also easy to add fruit like strawberries or raspberries for a twist on the classic recipe.
Light and Low in Calories
Compared to heavier cocktails, Mojitos are relatively light and can be made low in calories, especially if you opt for a sugar substitute or reduce the rum. This makes them a guilt-free treat when you’re watching your calorie intake.
Popular and Crowd-Pleasing
Because of its widespread appeal, the Mojito is a great choice for parties and gatherings. It’s a safe bet that most guests will enjoy its light, refreshing taste.
Disadvantages of a Mojito
Requires Fresh Ingredients
One downside to making Mojitos is that fresh ingredients are a must. You’ll need fresh mint leaves and lime juice for the best results, which can be a bit of a hassle if you don’t have them on hand.
Can Be Time-Consuming
If you’re making Mojitos for a group, the muddling process can be time-consuming. It’s not the quickest cocktail to prepare in large batches, and the mint can sometimes clog up a straw or stick to the glass, making it tricky to drink.
Balance of Flavors Can Be Tricky
A perfect Mojito requires balance. Too much sugar can make it overly sweet, while too much lime can make it too tart. If you don’t measure the ingredients carefully, the drink can easily lose its refreshing charm.
Ice Dilution
Since the drink is served with a lot of ice, it can get watered down over time, especially if you’re sipping it slowly. This could dilute the flavors and make the drink less enjoyable as it warms up.
Some People Don’t Like Mint
While mint is the hallmark of a Mojito, it’s also an ingredient that not everyone enjoys. If you’re serving Mojitos at a gathering, keep in mind that some people might not love the minty flavor as much as others.
Mojito recipe
FAQs About Mojitos
How can I make a Mojito less sweet?
Reduce the amount of sugar or simple syrup, and add more lime juice for extra tartness.
Can I use different types of rum?
Yes, but white rum is recommended for the best balance of flavors.
Is there a non-alcoholic version of a Mojito?
Yes! Simply omit the rum and replace it with club soda or sparkling water.
What food pairs well with a Mojito?
Light, fresh dishes like ceviche, grilled shrimp, and tropical fruits work well with a Mojito.
Can I make Mojitos in advance?
You can prepare the mint, lime, and sugar mixture ahead of time, but wait to add the rum, soda, and ice until you’re ready to serve to keep the drink fresh.
Now that you know how to make a Mojito, it’s time to give it a try! With just a few simple ingredients and a bit of practice, you’ll be able to create a refreshing, perfectly balanced Mojito that’s sure to impress. Whether you stick to the classic recipe or try one of the fun variations, your Mojito is guaranteed to be a hit at your next gathering.
Ultimate Guide to Making the Perfect Chicken Brine’ Recipe “Discover the perfect chicken brine recipe for juicy, flavorful results. Try it now with simple ingredients. Brining chicken is a time-honored technique used to keep the meat juicy and flavorful. If you’ve ever wondered how to …
Introduction If you’ve been searching for an easy, delicious, and hearty dish, look no further than Mississippi Chicken. This Southern classic packs tons of flavor with simple ingredients and minimal effort, making it a perfect choice for a busy weeknight meal. In this article, we’ll …
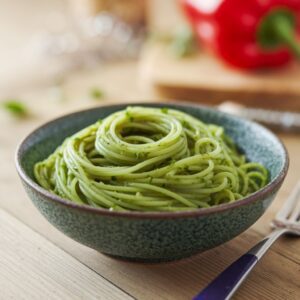
Green Spaghetti Recipe: A Flavorful Twist on a Classic Dish
Introduction
Green Spaghetti Recipe
Green spaghetti, also known as “espagueti verde,” is a delicious and vibrant dish that brings a burst of color and flavor to your table. This Mexican-inspired pasta dish combines the creaminess of a rich sauce with the fresh taste of green ingredients like poblano peppers, cilantro, and spinach. Whether you’re looking to impress guests or simply want to try something new, this green spaghetti recipe is the perfect choice.
Ingredients
For the Green Sauce:
4 large poblano peppers
1 cup fresh cilantro leaves
1 cup fresh spinach leaves
1/2 cup sour cream
1/2 cup cream cheese, softened
1/4 cup milk
2 garlic cloves, minced
1/4 cup onion, chopped
1 tablespoon olive oil
Salt and pepper to taste
For the Spaghetti:
1 pound spaghetti
Water for boiling
Salt for seasoning
2 tablespoons butter
Instructions
Green Spaghetti Recipe
1. Roast the Poblano Peppers
Start by roasting the poblano peppers. Place them directly over a gas flame or under a broiler, turning them until all sides are charred and blackened. Once charred, place the peppers in a plastic bag and let them steam for about 10 minutes. After steaming, peel off the charred skin, remove the seeds, and set the peppers aside.
2. Cook the Spaghetti
In a large pot, bring water to a boil. Add a generous amount of salt to the boiling water, then add the spaghetti. Cook according to the package instructions until al dente. Drain the pasta, reserving 1/2 cup of the pasta water, and set aside.
3. Prepare the Green Sauce
In a blender, combine the roasted poblano peppers, cilantro, spinach, sour cream, cream cheese, milk, minced garlic, and chopped onion. Blend until smooth. If the sauce is too thick, add the reserved pasta water a little at a time until you reach your desired consistency.
4. Cook the Green Sauce
In a large pan, heat the olive oil over medium heat. Pour in the green sauce and cook for about 5 minutes, stirring occasionally, until the sauce is heated through and slightly thickened. Season with salt and pepper to taste.
5. Combine the Spaghetti and Sauce
Add the cooked spaghetti to the pan with the green sauce. Toss the spaghetti in the sauce until it is well coated. Add the butter and continue to toss until the butter is melted and the spaghetti is evenly coated.
6. Serve the Green Spaghetti
Serve the green spaghetti hot, garnished with extra cilantro or a sprinkle of cheese if desired. This dish pairs beautifully with grilled chicken, shrimp, or a simple side salad.
Advantages of Green Spaghetti
Green Spaghetti Recipe
Unique Flavor: The combination of poblano peppers, cilantro, and spinach creates a fresh and vibrant flavor that’s different from traditional tomato-based pasta dishes.
Nutritious: Packed with leafy greens like spinach and cilantro, this dish is a great way to incorporate more vegetables into your diet.
Versatile: Green spaghetti can be paired with various proteins such as grilled chicken, shrimp, or even tofu, making it a versatile dish for different dietary preferences.
Visually Appealing: The bright green color of the sauce makes this dish visually appealing, perfect for impressing guests at dinner parties.
Creamy Texture: The combination of cream cheese and sour cream gives the sauce a rich and creamy texture that coats the pasta beautifully.
Requires Extra Steps: Roasting and peeling the poblano peppers adds an extra step to the preparation process, which might be time-consuming for some.
Potential Heat: Depending on the poblano peppers, the dish may have a mild to moderate level of spiciness, which may not be suitable for everyone.
Ingredient Availability: Fresh poblano peppers and cilantro may not always be available in every grocery store, making it challenging to prepare the dish at times.
Calorie Content: The addition of sour cream, cream cheese, and butter increases the calorie content of the dish, making it a more indulgent option.
Storage Considerations: This dish is best served fresh. While leftovers can be stored in the refrigerator, the sauce may lose its vibrant color and texture when reheated.
Conclusion
Green Spaghetti Recipe
Green spaghetti is a delightful and flavorful twist on a classic pasta dish. With its unique combination of ingredients and vibrant color, it’s sure to become a favorite in your recipe rotation. While it does require a few extra steps, the end result is a creamy, delicious dish that’s perfect for both weeknight dinners and special occasions. Just be mindful of the spiciness and calorie content, and you’ll enjoy every bite!
Frequently Asked Questions (FAQs)
Can I use a different type of pasta for this recipe?
Yes, you can substitute the spaghetti with other pasta types like fettuccine, linguine, or penne.
Is there a way to make this dish less spicy?
To reduce the spiciness, remove the seeds from the poblano peppers or use a smaller amount of peppers.
Can I make this dish ahead of time?
While it’s best served fresh, you can make the sauce ahead of time and store it in the refrigerator for up to 2 days. Reheat and toss with freshly cooked pasta before serving.
What can I substitute for cream cheese?
You can use ricotta cheese or Greek yogurt as a substitute for cream cheese in the sauce.
Can I freeze the green sauce?
Yes, the green sauce can be frozen for up to 2 months. Thaw and reheat before tossing with freshly cooked pasta.
Cinnamon Roll Icing Recipe: The Perfect Finishing Touch Introduction What’s a cinnamon roll without its icing? The icing is the crowning glory of any cinnamon roll, adding that final touch of sweetness and creaminess that makes each bite irresistible. While store-bought icing might be convenient, …